Azure DevOps: CICD Multiple Release Pipelines
In this journal, we will take another step after setting up the CICD pipeline in previous Journal.
Motivation
When we work on the web application, we may need to deploy the application on multiple sites such as stage, development (dev), qa, or production (Prod) using the same source code with slightly different settings or configuration. This process helps the team to branch out and divide the development into multiple stages. However, doing this process manually could be tedious and it tends to consume a lot of development time. With the CICD set up properly, the integration and development process will become much easier. That means that CICD does not only automate the integration process, but also provides the developer team the capabilities to deploy the sites quicker.
Recap from last journal
Remember when we set up CICD, we followed the following procedure:
- Create repo and push code on Azure DevOps
- Generate PAT
- Create agent on a server to build, run, test, and deploy
- Set up Deployment Group
- Set up Build (CI) pipeline yaml or classic pipeline using Azure DevOps Services
- Set up Release (CD) pipeline to deploy the web application automatically
We have done all the step, but within a single pipeline.
What we learn in this journal
- How seperate the
appsettingsorsssfor different sites using on the same source code - How to create multiple artifact (publish) for different sites
- How to set up multiple release pipeline to deploy to different sites
Divide Build pipeline into multiple stages
From the last journal, our azure-pipeline.yaml was written as below.
trigger:
- master

pool:
  name: default
  demands:
  - Agent.Version -gtVersion 2.153.1
  - Agent.Name -equals agent1

variables:
  solution: '**/*.sln'
  buildPlatform: 'Any CPU'
  buildConfiguration: 'Release'

steps:
- task: DotNetCoreCLI@2
  inputs:
    command: 'build'
    projects: '$(solution)'
    configuration: '$(buildConfiguration)'

- task: DotNetCoreCLI@2
  inputs:
    command: 'publish'
    publishWebProjects: true
    zipAfterPublish: false
    arguments: '--configuration $(buildConfiguration) --output $(Build.ArtifactStagingDirectory)'

- task: DotNetCoreCLI@2
  displayName: Publish
  inputs:
    command: publish
    publishWebProjects: True
    arguments: '--configuration $(BuildConfiguration) --output $(build.artifactstagingdirectory)'
    zipAfterPublish: false

- task: PublishBuildArtifacts@1
  displayName: 'Publish Artifact'
  inputs:
    PathtoPublish: '$(build.artifactstagingdirectory)'
    ArtifactName: publish
  condition: succeededOrFailed()
Now, we need to modify this yaml to include multiple stages for build and create specificts artifacts.
# Start with a minimal pipeline that you can customize to build and deploy your code.
# Add steps that build, run tests, deploy, and more:
# https://aka.ms/yaml

trigger:
- master

variables:
  solution: '**/*.sln'
  buildPlatform: 'Any CPU'
  buildConfiguration: 'Release'

stages:
  - stage: Build
    jobs:
      - job: Build
        pool:
          name: default
          demands:
          - Agent.Name -equals agent1
          - Agent.Version -gtVersion 2.153.1
        steps:
        - task: DotNetCoreCLI@2
          inputs:
            command: 'build'
            projects: '$(solution)'
            configuration: '$(buildConfiguration)'
  - stage: Stage
    dependsOn: Build
    jobs:
    - job: CreateArtifact
      pool:
        name: default
        demands:
        - Agent.Version -gtVersion 2.153.1
      steps:
      - task: DotNetCoreCLI@2
        inputs:
          command: 'publish'
          publishWebProjects: true
          zipAfterPublish: false
          arguments: '--configuration $(buildConfiguration) --output $(Build.ArtifactStagingDirectory)'
      - task: DownloadSecureFile@1
        inputs:
          secureFile: 'appsettings.stage.json'
      - task: PowerShell@2
        inputs:
          targetType: inline
          script: Copy-Item -Path "$(Agent.TempDirectory)/appsettings.stage.json" -Destination "$(Build.ArtifactStagingDirectory)/test-cicd/appsettings.json"
        displayName: 'Copy stage appsettings'
      - task: DownloadSecureFile@1
        inputs:
          secureFile: 'site.stage.css'
      - task: PowerShell@2
        inputs:
          targetType: inline
          script: Copy-Item -Path "$(Agent.TempDirectory)/site.stage.css" -Destination "$(Build.ArtifactStagingDirectory)/test-cicd/wwwroot/app.css"
        displayName: 'Copy stage site.css'
      - task: PublishBuildArtifacts@1
        displayName: 'Publish Artifact'
        inputs:
          PathtoPublish: '$(build.artifactstagingdirectory)'
          ArtifactName: publishStage
        condition: succeededOrFailed()
  - stage: MHP
    dependsOn: Stage
    jobs:
      - job: CreateArtifact
        pool:
          name: default
          demands:
          - Agent.Version -gtVersion 2.153.1
        steps:
        - task: DotNetCoreCLI@2
          inputs:
            command: 'publish'
            publishWebProjects: true
            zipAfterPublish: false
            arguments: '--configuration $(buildConfiguration) --output $(Build.ArtifactStagingDirectory)'
        - task: DownloadSecureFile@1
          inputs:
            secureFile: 'appsettings.mhp.json'
        - task: PowerShell@2
          inputs:
            targetType: inline
            script: Copy-Item -Path "$(Agent.TempDirectory)/appsettings.mhp.json" -Destination "$(Build.ArtifactStagingDirectory)/test-cicd/appsettings.json"
          displayName: 'Copy mhp appsettings'
        - task: DownloadSecureFile@1
          inputs:
            secureFile: 'site.mhp.css'
        - task: PowerShell@2
          inputs:
            targetType: inline
            script: Copy-Item -Path "$(Agent.TempDirectory)/site.mhp.css" -Destination "$(Build.ArtifactStagingDirectory)/test-cicd/wwwroot/app.css"
          displayName: 'Copy mhp site.css'
        - task: PublishBuildArtifacts@1
          displayName: 'Publish Artifact'
          inputs:
            PathtoPublish: '$(build.artifactstagingdirectory)'
            ArtifactName: publishMHP
          condition: succeededOrFailed()
  - stage: SUD
    dependsOn: MHP
    jobs:
      - job: CreateArtifact
        pool:
          name: default
          demands:
          - Agent.Version -gtVersion 2.153.1
        steps:
        - task: DotNetCoreCLI@2
          inputs:
            command: 'publish'
            publishWebProjects: true
            zipAfterPublish: false
            arguments: '--configuration $(buildConfiguration) --output $(Build.ArtifactStagingDirectory)'
        - task: DownloadSecureFile@1
          inputs:
            secureFile: 'appsettings.sud.json'
        - task: PowerShell@2
          inputs:
            targetType: inline
            script: Copy-Item -Path "$(Agent.TempDirectory)/appsettings.sud.json" -Destination "$(Build.ArtifactStagingDirectory)/test-cicd/appsettings.json"
          displayName: 'Copy sud appsettings'
        - task: DownloadSecureFile@1
          inputs:
            secureFile: 'site.sud.css'
        - task: PowerShell@2
          inputs:
            targetType: inline
            script: Copy-Item -Path "$(Agent.TempDirectory)/site.sud.css" -Destination "$(Build.ArtifactStagingDirectory)/test-cicd/wwwroot/app.css"
          displayName: 'Copy sud site.css'
        - task: PublishBuildArtifacts@1
          displayName: 'Publish Artifact'
          inputs:
            PathtoPublish: '$(build.artifactstagingdirectory)'
            ArtifactName: publishSUD
          condition: succeededOrFailed()
As shown above, we divide the main stage into 4 different stages:
- Build
- Stage
- MHP
- SUD
Note: MHP and SUD are just the feature/production branch that I have to develop at my current workplace. We could think of them as the prod (production) or qa stage.
Generally, the structure schema of this yaml looks like this:
Stages:
  - stage: <stage_name>
  - jobs:
    - job: <job_1_name>
      pool:
        name: <name_of_agent_pool>
          demands:
            <any demands such capabilities, software, tool that agent needs to perform tasks>
      steps:
        - task: <name>
          inputs:
            <see the microsoft documents for full details>
Stage is at the top level of the each process in the pipeline. Within stage, we can define multiple jobs. Each jobs can have multiple tasks. Task is the smallest process unit in the build pipeline.
If we need dependencies or order in the process, we can utilize the keyword dependsOn on either stage or job. This way, the build pipeline will execute stage or job in a sequence that we can control.
In our aure-pipeline.yaml, we first build the project using Dotnet CLI. Then, we create the artifacts for different site. We can think of artifact is the deployment package, publish, or output folders. Most of websites will use the release or deployment package to render content.
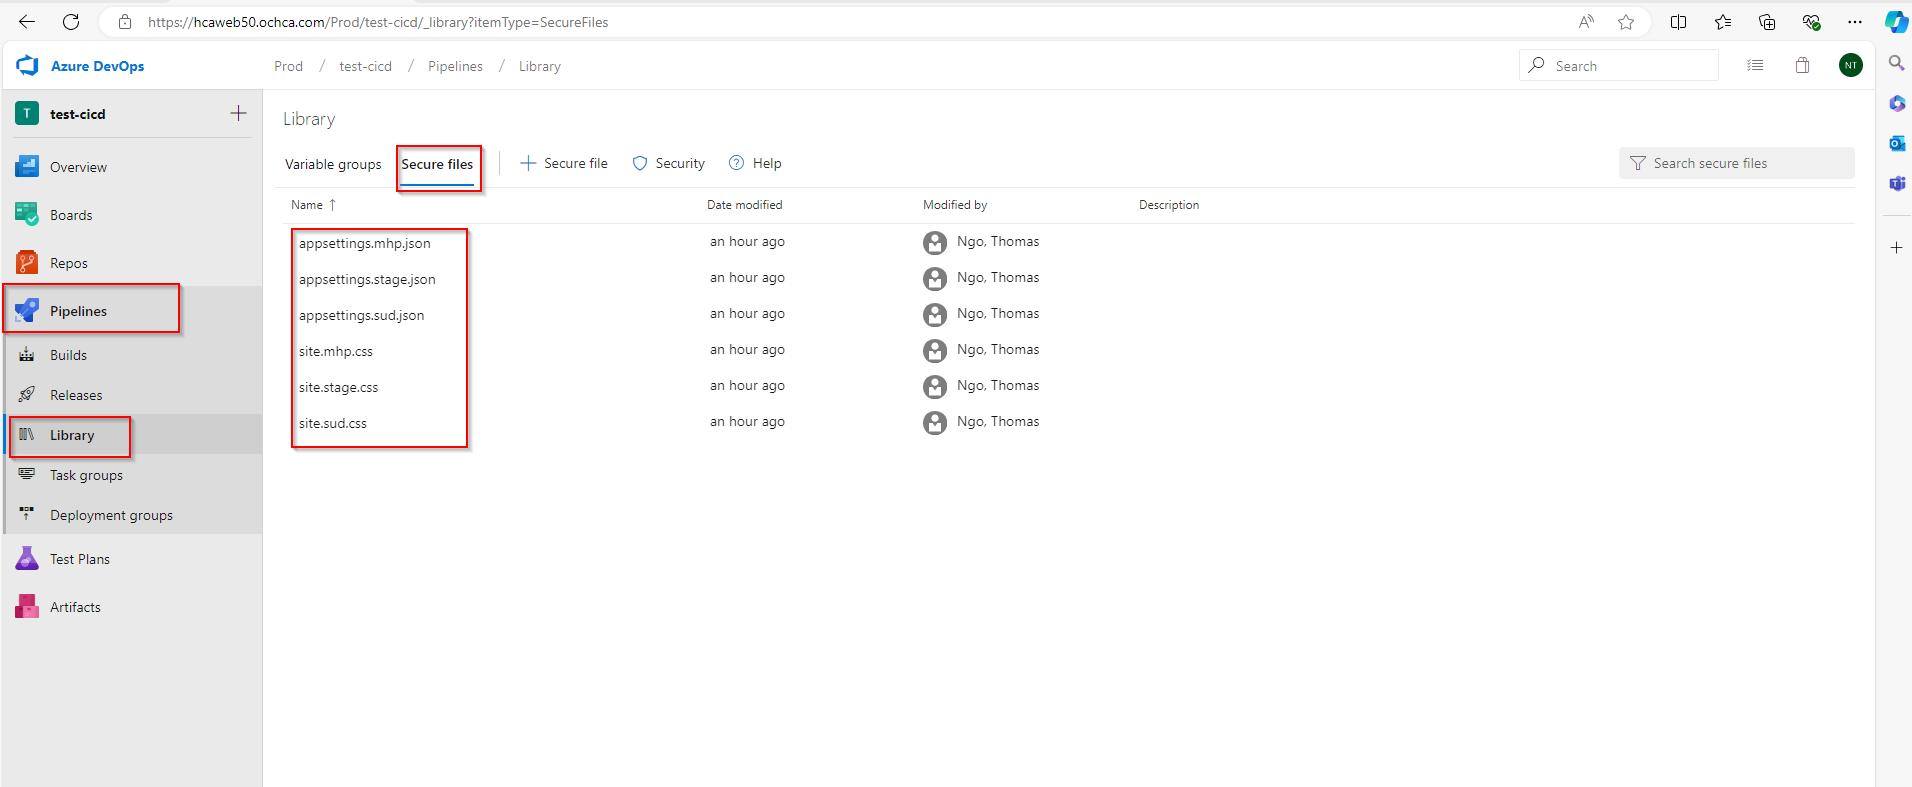
Since our use case requires each site to have different appsettings and site.css, we can store these dependency files as secure files and tell agent to download and replace the appsettings and app.css inside the build project.
On Azure DevOps UI, click Pipelines > Library > Secure files. Add the each file manually.
In the yaml, this is how we download and and replace the files inside Artifact (publish/drop folder). In this example, we are using powershell script to perform the copy, but we could use other shell suchs bash, cmd, etc. to do the same thing. Just make sure that agent has the tools that it needs to perform the task.
- task: DownloadSecureFile@1
  inputs:
    secureFile: 'appsettings.stage.json'
- task: PowerShell@2
  inputs:
    targetType: inline
    script: Copy-Item -Path "$(Agent.TempDirectory)/appsettings.stage.json" -Destination "$(Build.ArtifactStagingDirectory)/test-cicd/appsettings.json"
  displayName: 'Copy stage appsettings'
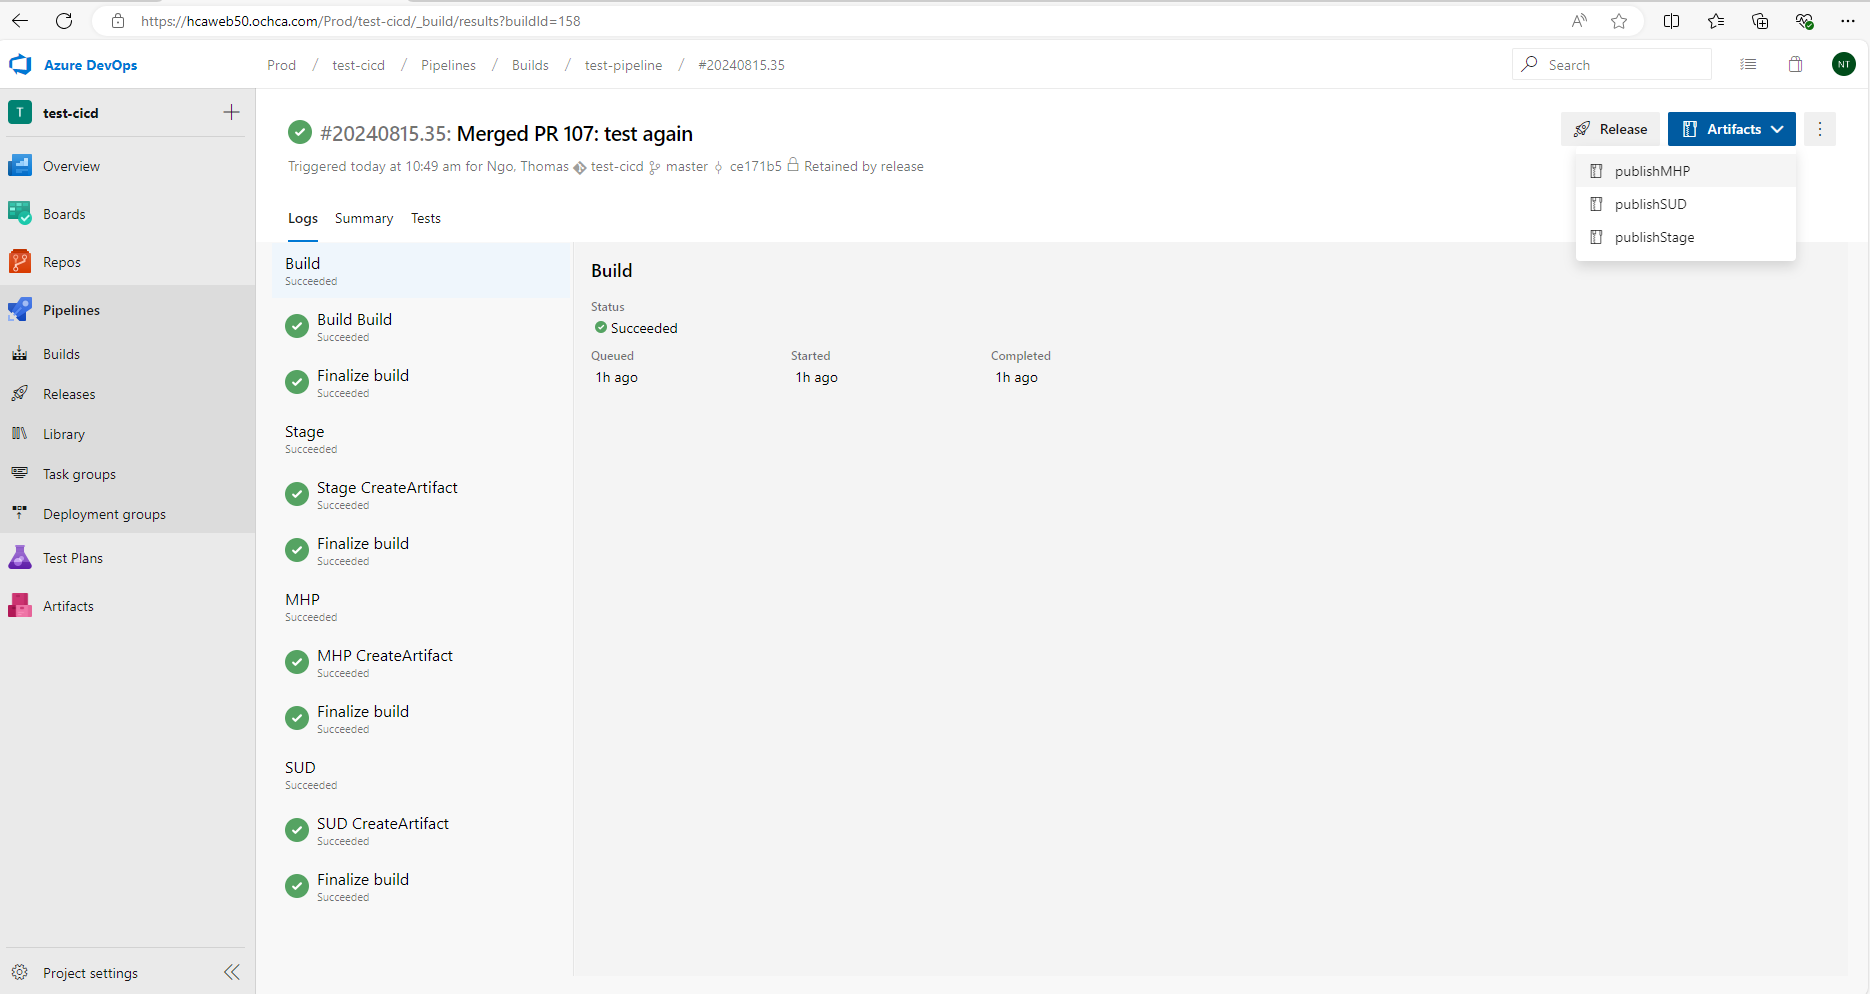
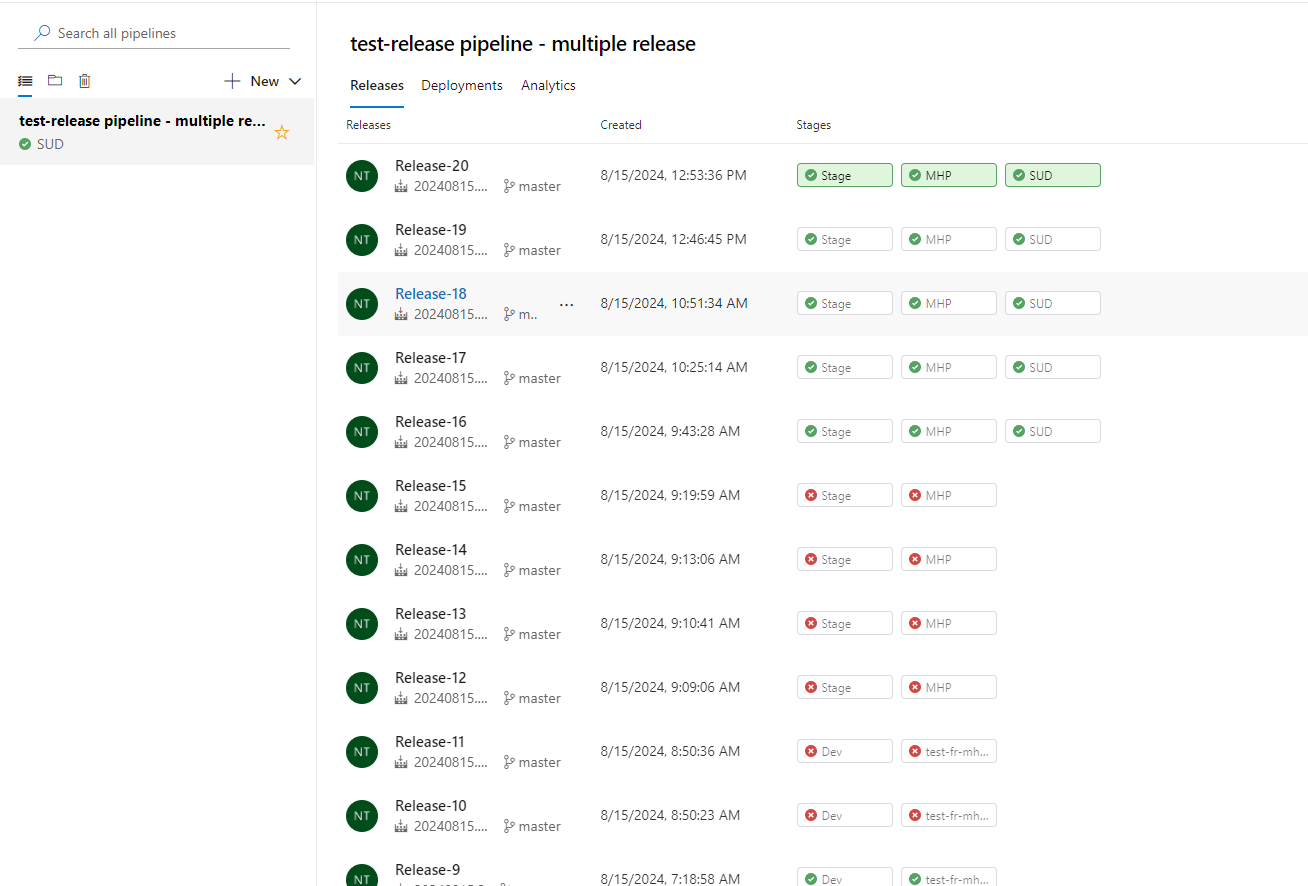
If everything runs smoothly, we will see the three artifacts generated.
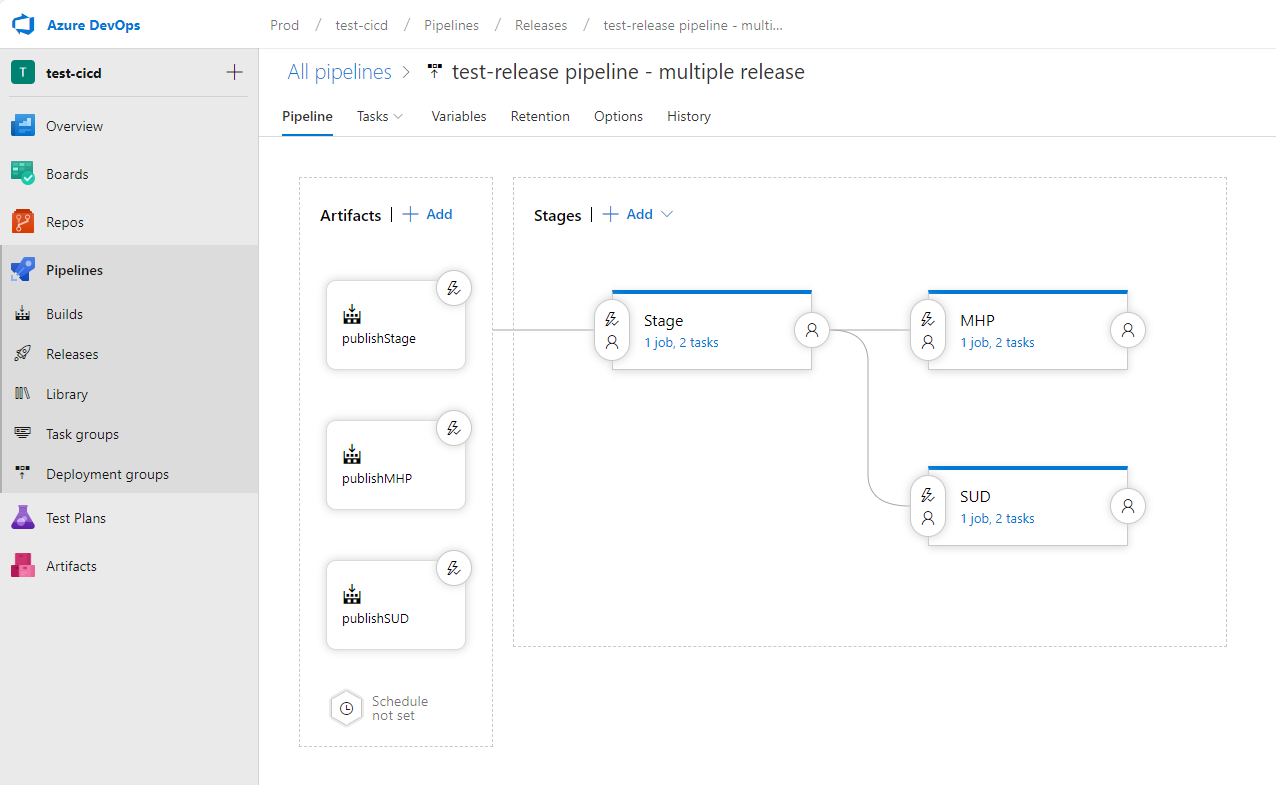
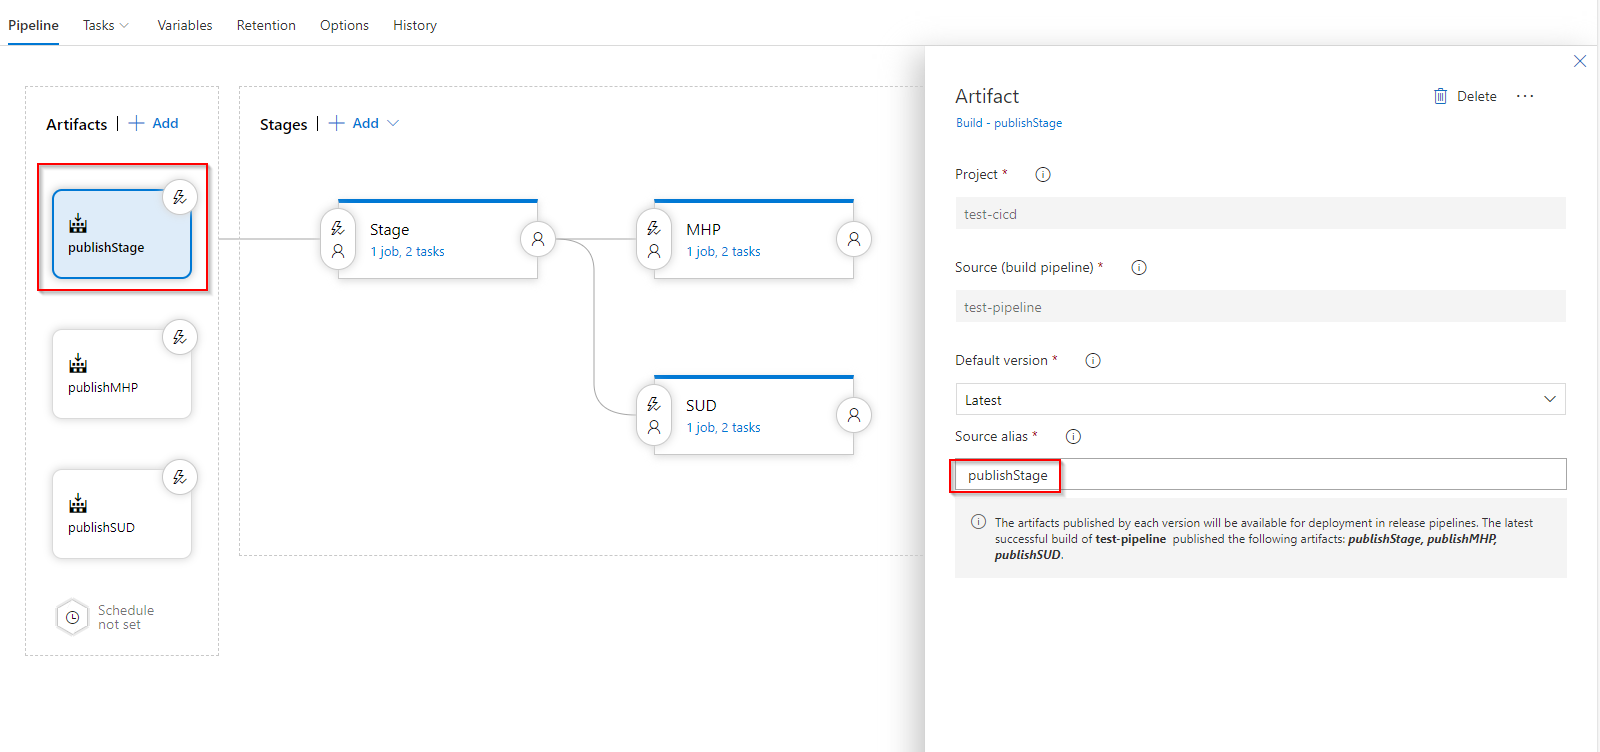
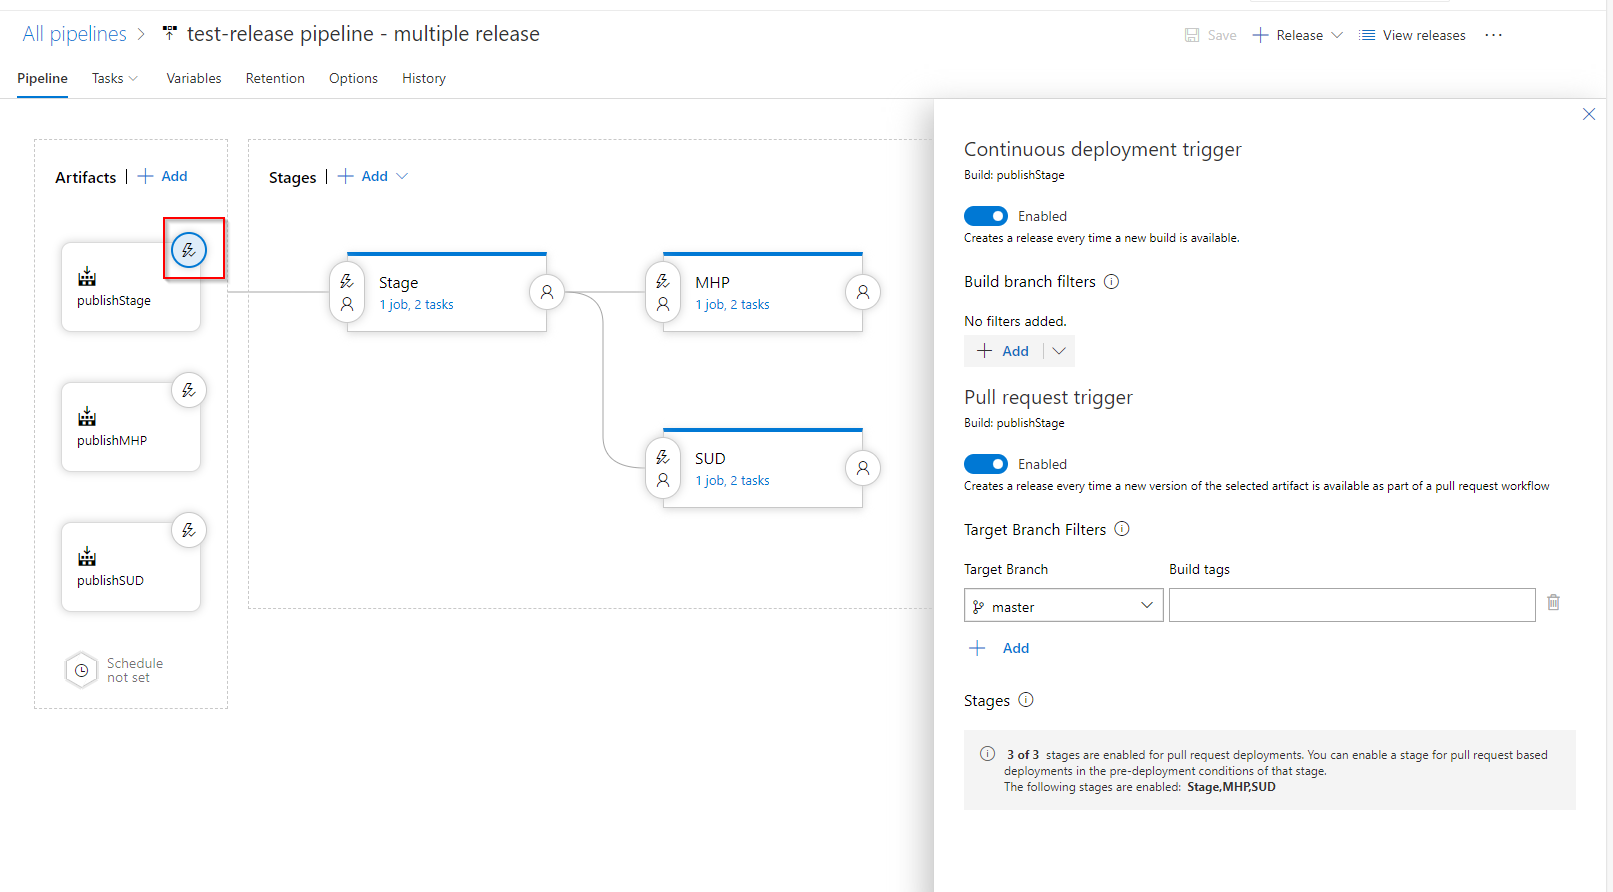
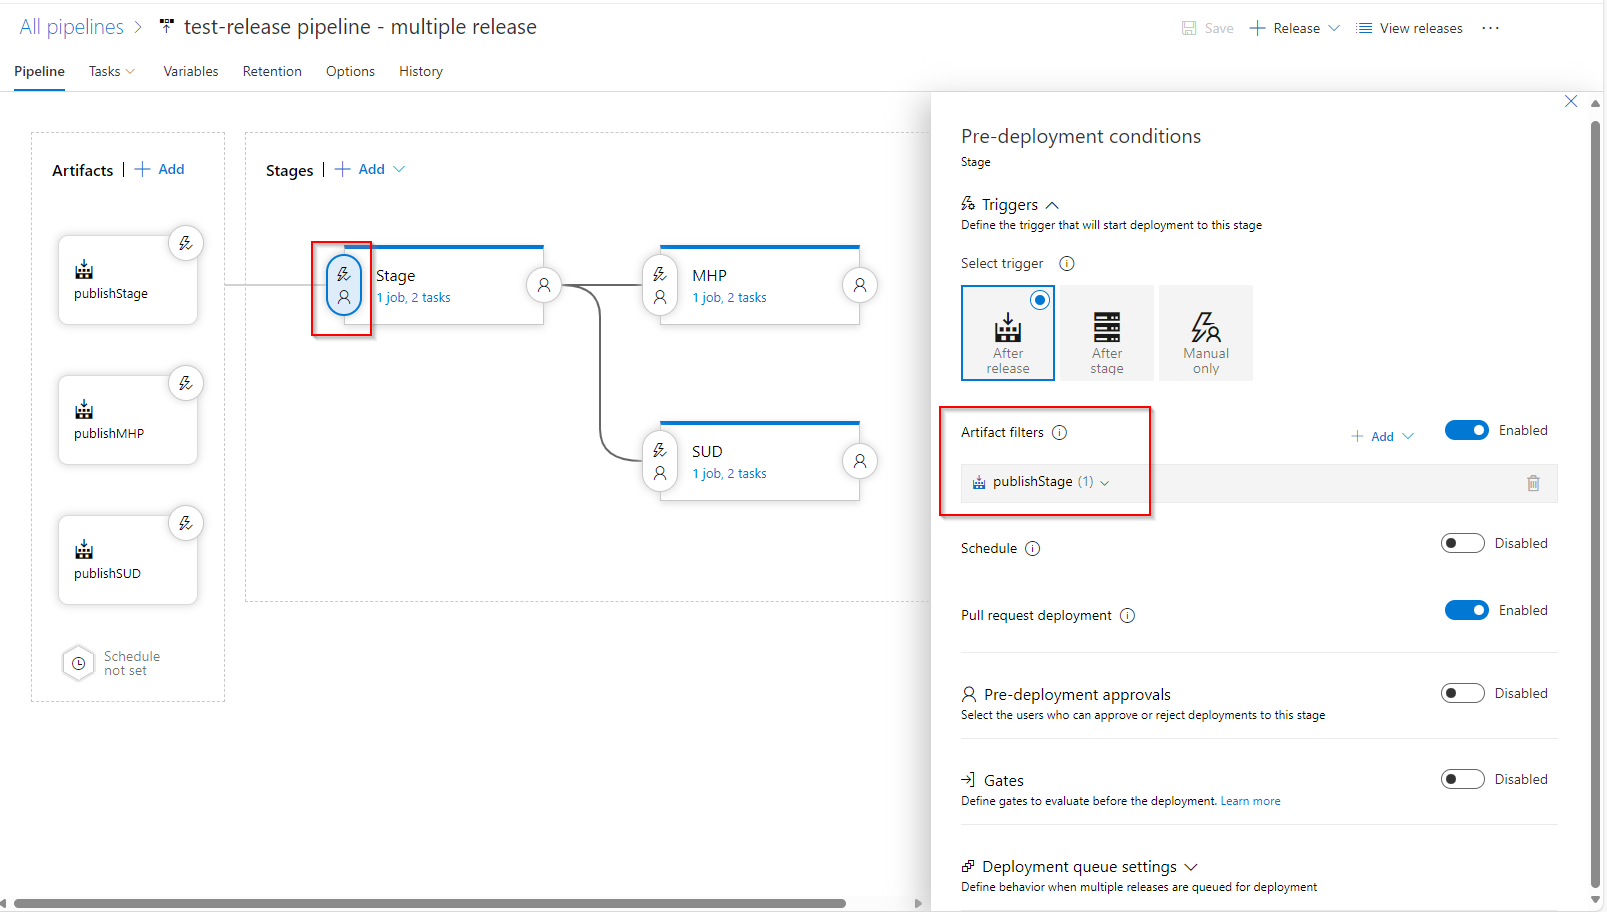
Set up multilple Release Pipelines
Next, we set up the release pipelines.
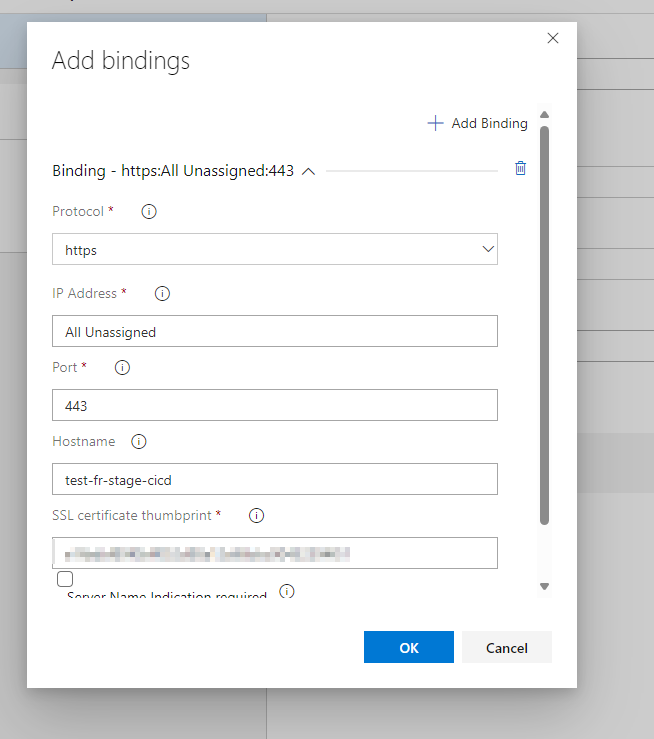
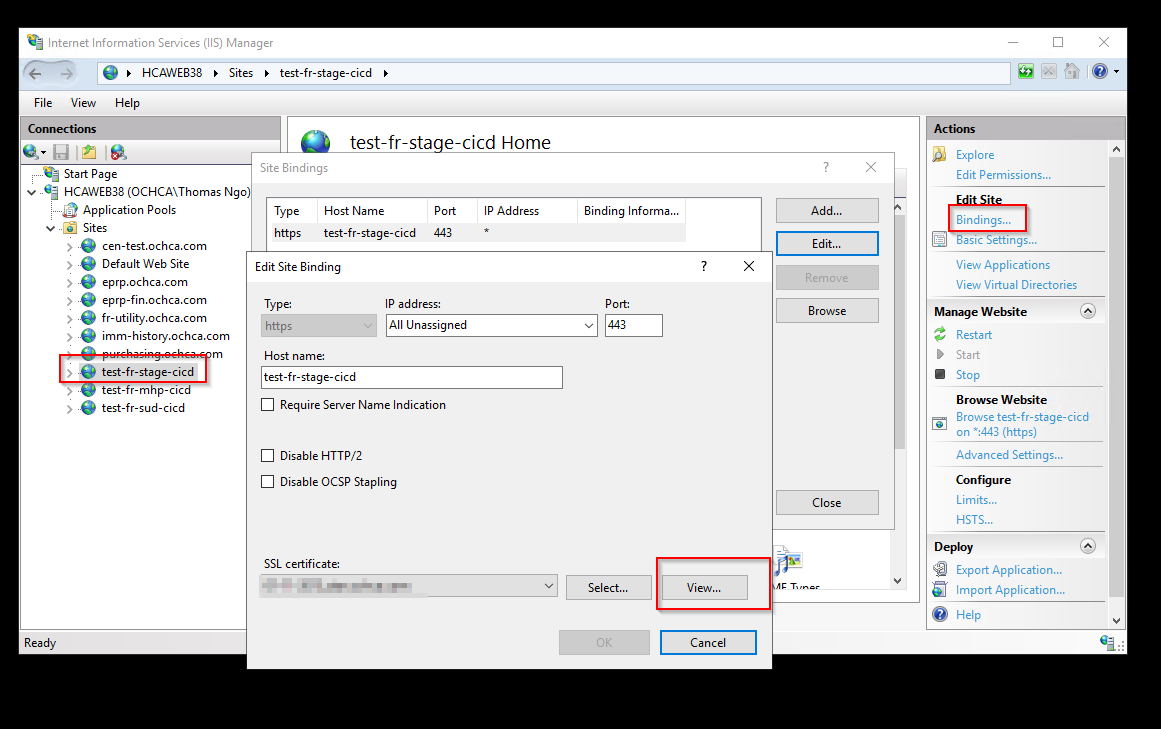
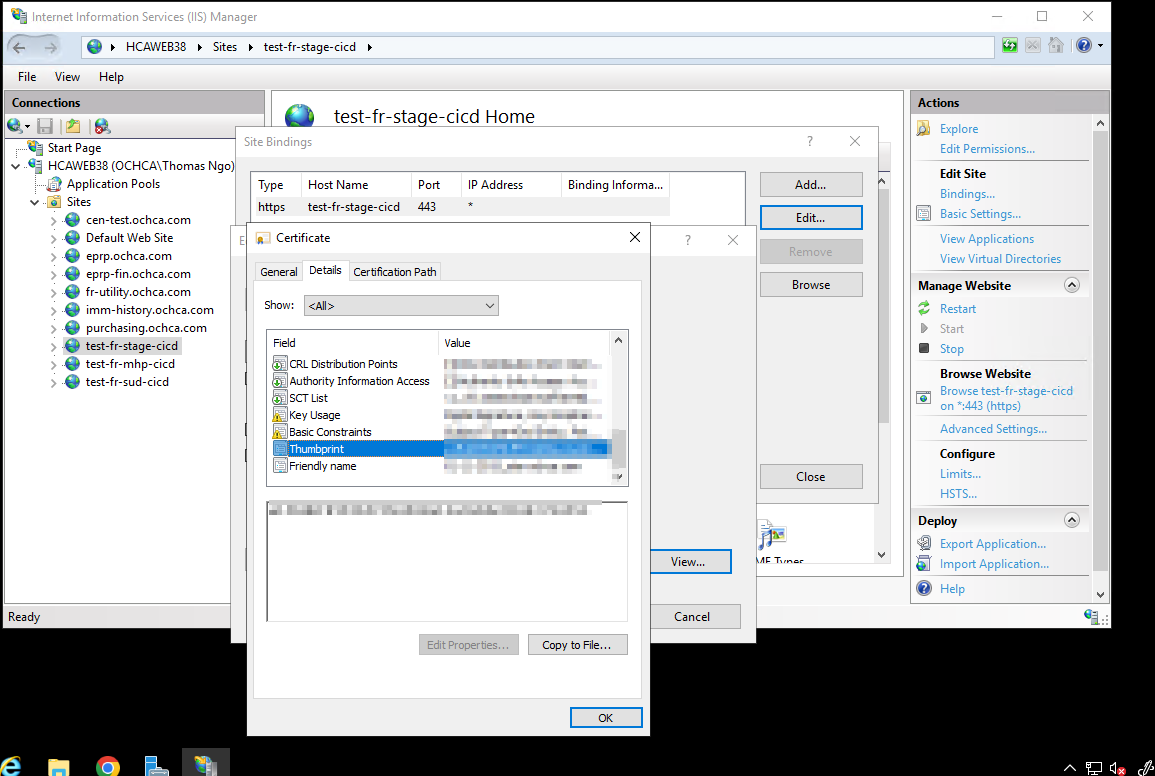
To Find the SSL certifcate thumbprint, we can search inside IIS.
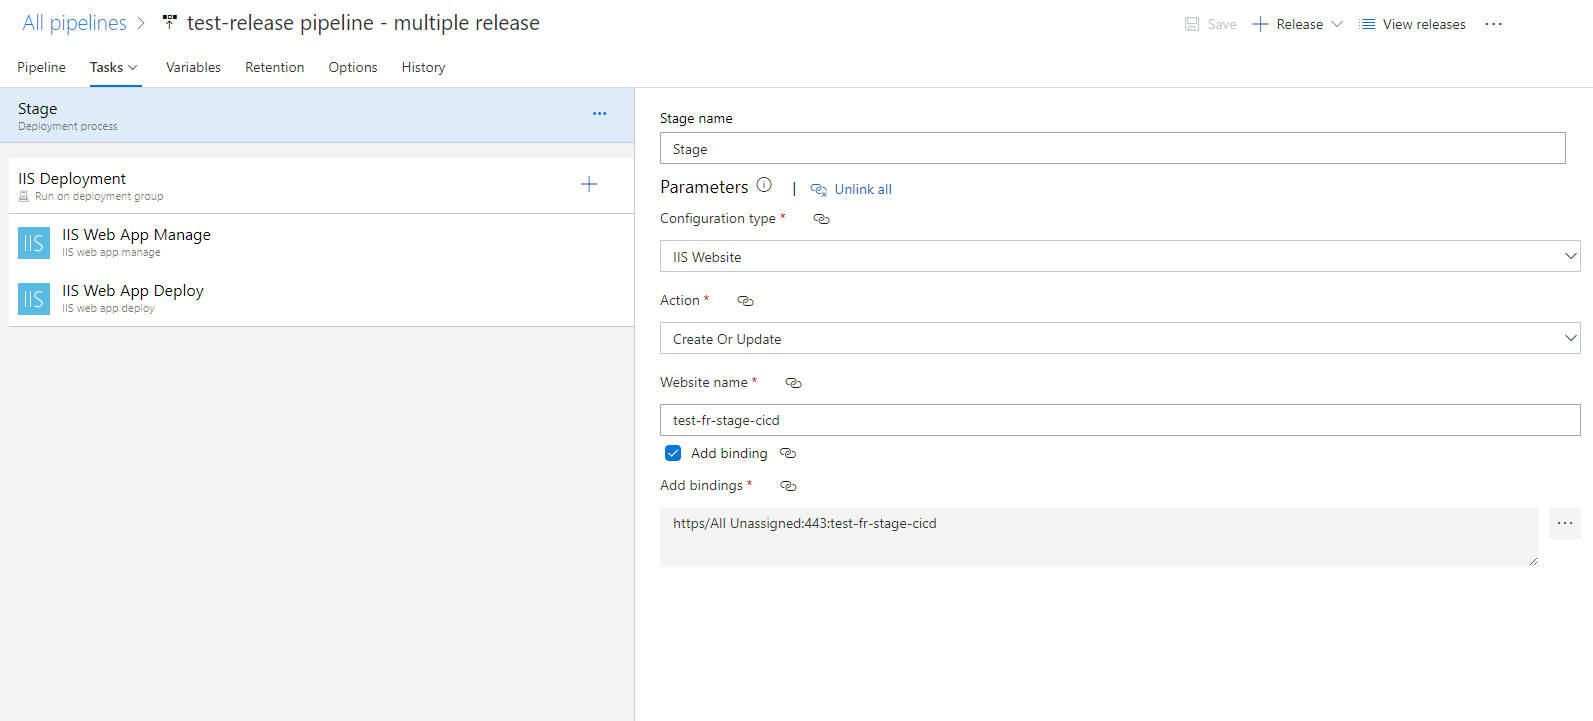
If everything runs successfully, we see something like this.

IIS Web App Manage
#Your build pipeline references an undefined variable named ‘Parameters.IISDeploymentType’. Create or edit the build pipeline for this YAML file, define the variable on the Variables tab. See https://go.microsoft.com/fwlink/?linkid=865972
#Your build pipeline references an undefined variable named ‘Parameters.ActionIISWebsite’. Create or edit the build pipeline for this YAML file, define the variable on the Variables tab. See https://go.microsoft.com/fwlink/?linkid=865972
#Your build pipeline references an undefined variable named ‘Parameters.WebsiteName’. Create or edit the build pipeline for this YAML file, define the variable on the Variables tab. See https://go.microsoft.com/fwlink/?linkid=865972
#Your build pipeline references an undefined variable named ‘Parameters.AddBinding’. Create or edit the build pipeline for this YAML file, define the variable on the Variables tab. See https://go.microsoft.com/fwlink/?linkid=865972
#Your build pipeline references an undefined variable named ‘Parameters.Bindings’. Create or edit the build pipeline for this YAML file, define the variable on the Variables tab. See https://go.microsoft.com/fwlink/?linkid=865972
#Your build pipeline references an undefined variable named ‘Parameters.WebsiteName’. Create or edit the build pipeline for this YAML file, define the variable on the Variables tab. See https://go.microsoft.com/fwlink/?linkid=865972
#Your build pipeline references an undefined variable named ‘Parameters.VirtualPathForApplication’. Create or edit the build pipeline for this YAML file, define the variable on the Variables tab. See https://go.microsoft.com/fwlink/?linkid=865972
#Your build pipeline references an undefined variable named ‘Parameters.AppPoolName’. Create or edit the build pipeline for this YAML file, define the variable on the Variables tab. See https://go.microsoft.com/fwlink/?linkid=865972

steps:
- task: IISWebAppManagementOnMachineGroup@0
  displayName: 'IIS Web App Manage'
  inputs:
    IISDeploymentType: '$(Parameters.IISDeploymentType)'
    ActionIISWebsite: '$(Parameters.ActionIISWebsite)'
    WebsiteName: '$(Parameters.WebsiteName)'
    WebsitePhysicalPath: '\\hcaweb38\d$\inetpub\test-fr-stage-cicd'
    AddBinding: '$(Parameters.AddBinding)'
    Bindings: '$(Parameters.Bindings)'
    ParentWebsiteNameForVD: '$(Parameters.WebsiteName)'
    VirtualPathForVD: '$(Parameters.VirtualPathForApplication)'
    ParentWebsiteNameForApplication: '$(Parameters.WebsiteName)'
    VirtualPathForApplication: '$(Parameters.VirtualPathForApplication)'
    AppPoolName: '$(Parameters.AppPoolName)'
IIS Web App Deploy
#Your build pipeline references an undefined variable named ‘Parameters.WebsiteName’. Create or edit the build pipeline for this YAML file, define the variable on the Variables tab. See https://go.microsoft.com/fwlink/?linkid=865972

steps:
- task: IISWebAppDeploymentOnMachineGroup@0
  displayName: 'IIS Web App Deploy'
  inputs:
    WebSiteName: '$(Parameters.WebsiteName)'
    Package: '$(System.DefaultWorkingDirectory)/publishStage/publishStage/test-cicd'
    TakeAppOfflineFlag: True
    XmlVariableSubstitution: True